Tuesday, November 27, 2007
Movie Time!
Wednesday, October 31, 2007
Happy Halloween!
Please be sure to view the full image to see all of the wonderful vein detail in the makeup! More pictures soon.

Monday, October 22, 2007
Look What I Did to Kate...
Wednesday, October 10, 2007
Fetus for Sale!

Another view of the fetuses:

A less interesting but clearer-looking photograph of one specimen:

Fetus, sans jar to show detail:

Friday, August 10, 2007
Oh, Nose!

Anyway, on to the business at hand - Kate's wonderful costume at the Labyrinth Masquerade, and the makeup job I did as part of it. As some of you might know, I've been interning at American Makeup and Effects this summer, so I've picked up a lot of skills in terms of creating special effects makeup. So, both as a favor to Kate and as a way to experience the process of designing and creating a makeup effect from start to finish, I did this for her:


For those of you who don't know how something like this is made, I'll explain the steps. First, we did a lifecast of Kate's nose, using alginate (kinda like the stuff they mold your teeth with when you go to the dentist). This gives us a negative mold of the nose.
Next I poured ultra-cal (a really fine cement-like compound) to make a stone positive of the nose.

On top of the positive, I sculpted a plasteline clay version of what I wanted the nose appliance to look like. Then, I made another ultra-cal mold from the sculpt before destroying the sculpt and removing all of the clay from the positive. This creates a negative space where the clay used to be, between the two parts.

I mixed a silicone compound called 3rd Degree and put it between the two parts of the mold, thus forming it into the appliance. I applied it with a silicone-based adhesive called Telesis and I airbrushed white Temptu Dura makeup onto Kate's body. The little bolts were made of a lightweight resin and the rust drips were with Mehron metallic and precious gem powders. Finally, there was a light misting of a Skin Illustrator platinum colored makeup to give the whole thing a kind of shiny look.

The finished outfit and makeup:

Sunday, July 22, 2007
A Fantastic Masquerade
Another piece of news is that I now have a domain name, http://www.baronvonfogel.net/ ! I'm still working on constructing the website so for now the URL forwards directly to this very blog. If you're visiting for the first time, I haven't got a portfolio or anything set up, so feel free to look through the archives of this blog. I tend to post most things I feel are worth sharing with the world. Enjoy!
Anyway, here are some photos from the ball:
First, here I am displaying my new bionic arm! (Detailed post to come)
 ...and flanked by some very fine Steampunk Gentlemen:
 With the lovely Katherine, whose makeup I did for the event. This photo was taken by the wonderful Neil Girling, an tall and lanky eccentric with a bowler hat, goggles, and camera. His work can be viewed at www.theblight.net if you're interested in seeing more from the ball.
Friday, July 13, 2007
Z-DAY 2007 Video
Now, if you'll excuse me, I must return to my laboratory where I am completing construction on my bionic aether-powered arm attachment.
Friday, July 06, 2007
Sisyphus v2.0
Friday, June 01, 2007
Robots in space!
View the full version of the picture to see the puppet detail... Both are made from wire, balsa, and epoxy putty. I'll get the video uploaded soon.

Monday, May 21, 2007
Beware the Jabberwock, my son!
This is the video of the animation that I did for my Intro to Puppet Animation course with the Jabberwock puppet that I showed a few posts ago. The video was a collaboration with Jon Betz, who created and animated the spaceman character. Sorry about the poor video quality, but it's better than nothing. Enjoy!
Monday, May 07, 2007
How's that for a slice of fried gold?
Saturday, April 28, 2007
We're coming to get you, Barbara....

That's right! I organized a massive army of the undead! Last year's group was great, with around 35 zombies, but this year we had a whopping 140 in attendance! We had an amazing time terrorizing the neighborhood and wreaking havoc on the campus of our neighboring college, Brown University. Anyway, this is just a sneak preview. I'll post more photos and videos as I get them!
Sunday, April 22, 2007
'Twas brillig, and the slithy toves...
This semester I'm taking an amazing Puppet Animation class, and for one of our projects I built this puppet. It's a Jabberwock, based on the Lewis Carroll poem, complete with jaws that bite and claws that catch!

The puppet is built from a wire armature around a bass wood core with brass tubing. The exterior is made of foam, with a layer of nylon stretched over it and a few coats of latex and acrylic paint. The head is sculpey.
Hopefully I'll upload the video of the animation I did with him sometime soon. Until then, you can check out these photos of the puppet!


And, as in uffish thought he stood,
The Jabberwock, with eyes of flame,
Came whiffling through the tulgey wood,
And burbled as it came!
Wednesday, February 14, 2007
Creature Creations: Part 4 - Final Creature
 ...and...
Behold, these amazing denizens of the deep!

Watch as Dakkar struggles with the fiendish Herbert!

Notice the bizarre breathing apparatus on Dakkar's back!


More photos will be posted soon.
Dakkar was created during a six week course called "Creature Creation Workshop" at the Rhode Island School of Design, in association with the Big Nazo Lab. He is constructed of various types of foam, covered in a mixture of liquid latex and acrylic paint. If you have any questions, feel free to comment below or to e-mail Baron von Fogel.
Saturday, February 03, 2007
Creature Creations: Part 3 - Preview Continued
 The colors will be slightly different, but this gives you a general idea of what he's going to look like.
 These are the creature's hands. The finished version will probably have a bit more in terms of striped markings on the backs of the hands. The webbing between the fingers will also be a little bit darker.
Anyway, the costume should be done sometime this week, so I'll post full-body shots soon.
Monday, January 29, 2007
Creature Creations: Part 2 - Sneak Preview
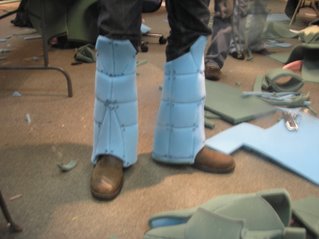
 Partially completed leg pieces, made out of 1/2 inch blue ester foam.
 A leg piece a little while later: foam bolts attached, some areas covered with a layer of nylon, and the whole thing sprayed with a thin coat of spray glue, to seal it.
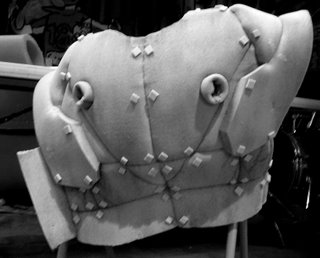
 Last but not least, a shot of the creature's back at the same stage in the process (foam construction, nylon, and glue). The two holes you see are sockets for short lengths of tubing that will connect from the back to the chest, as a sort of breathing apparatus.
That's all I'm giving away at the moment, but keep checking for more updates. After a coat of latex and then a nice paint job, the creature should be complete shortly.
Thursday, January 18, 2007
Creature Creations: Part 1
Here is what it looked like after the initial foam construction:

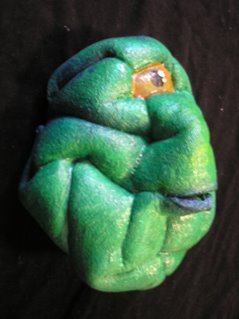
This is the blob after it was painted with a mixture of liquid latex and acrylic paint:


